French Dip Sandwich with Macaroni Salad

Basically for this recipe, I ended up cooking a roast, shredding it up (like a pulled beef sandwich), serving it on some crusty bread with some grilled onions and cheese, then I used the cooking liquid for the aus jus. Pretty easy and pretty damn good! 


Macaroni Salad
  • One 3 pound chuck roast
  • Salt and pepper to taste
  • 2 sprigs rosemary
  • 3-4 sprigs thyme
  • 3 cloves of garlic minced
  • 2 medium onions sliced (keep them separated)
  • 3-4 cups of beef broth
  • Crusty buns
  • Cheese slices for topping (I like swiss, John likes Provolone)

Season your chuck roast with salt and pepper generously. Brown all sides in a large skillet. Once browned transfer to a crock pot and add in rosemary, thyme, garlic, onion (one), and broth. The broth should come pretty close to covering the roast. Cook on high for 1 hour. Turn the heat to low and cook for an additional 8 hours.

About an hour before serving, saute your onions until nice and golden brown in a saute pan and set aside (turn heat to medium, add in a small amount of olive oil, throw in your onions and let them cook for about 20 minutes). Remove roast and shred. Fish out all your little rosemary, onion, thyme bits from the cooking liquid and discard. Turn your broiler on. Fill your crusty buns with shredded beef, grilled onions, and cheese. Place under the broiler (about 6” away) for 2 to 3 minutes until cheese is bubbly. Serve with a side of the cooking liquid.

Enjoy... 


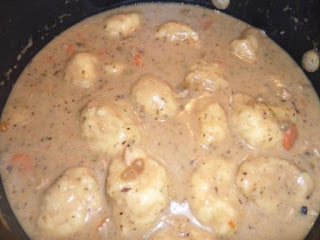
Chicken and Dumplings

I was hesitant at first because I am not a fan of soggy anything and I quickly thought the dumplings would be soggy. I'm glad I was wrong! I used to just use the canned biscuits to make dumplings then decided I would start experimenting with my own recipe. I think I have it down pretty solid at this point.


Yes, that creaminess comes from the dumplings - not cream!


For the soup…
  • 1.5 pounds boneless skinless chicken breasts cut into 1” cubes
  • 1 medium onion diced
  • 2 cloves garlic minced
  • 4 stalks celery diced
  • 4-5 carrots peeled and diced
  • 2 teaspoons fresh thyme chopped fine
  • 2 teaspoons fresh rosemary chopped fine
  • 6 cups chicken broth
  • Salt and pepper to taste

For the dumplings…
  • 2 cups baking mix (Bisquick)
  • ½ to 2/3 cup milk
  • 2 teaspoons unsalted butter melted
  • 2 teaspoons fresh thyme chopped fine
  • 2 teaspoons fresh rosemary chopped fine
Brown your chicken in a large pot. Add in the onion, garlic, celery, carrots, and herbs and stir to combine. Cover with chicken broth and salt and pepper to taste. Let simmer for at least an hour, but longer if you have it.

For the dumplings - In a large mixing bowl, mix together all ingredients. These will be a little bit sticky, but should have a thick, cake-like consistency. You can make these ahead and stick in the refrigerator until you are ready to add them.

Twenty five minutes before you are ready to serve, drop your dumplings spoonful by spoonful into your soup mixture. Put the lid on and let simmer for 15 minutes. Turn the dumplings over and cover again. Let simmer for 10 minutes. Stir and serve.

These dumplings are delicate until they are cooked - don’t fuss with them too much or they will fall apart.

Enjoy...

Baked Spaghetti

I am not a huge fan of Spaghetti normally... However this recipe makes the exception to the rule.


  • 6 ounces of spaghetti cooked to al dente
  • 2 tablespoons of butter
  • ½ cup grated or shredded parmesan cheese
  • 2 eggs beaten
  • 1 cup ricotta cheese
  • ½ pound ground beef
  • ½ pound hot Italian sausage
  • 1 small onion diced
  • 3 cloves garlic minced
  • 1-2 tablespoons Italian seasoning
  • 1 can diced Italian style tomatoes
  • ½ cup + ¾ cup mozzarella cheese shredded
  • Salt and pepper to taste

Preheat the oven to 400 degrees. Mix your spaghetti, melted butter, parmesan cheese, eggs, and salt and pepper to taste. Spray the bottom of a pie pan with cooking spray and press the spaghetti mixture into the bottom of it.  Bake for ten minutes to set. In the meantime, mix your ricotta cheese and ½ cup mozzarella cheese and salt and pepper to taste. Set aside. Brown the ground beef and Italian sausage. Rinse and drain. Add the onion, garlic, Italian seasoning, and salt and pepper and sauté for several minutes. Add in the diced tomatoes and let simmer until ready to use (this mixture should be pretty thick - you may not need the entire can of tomatoes).

Once the spaghetti is done baking, top with ricotta cheese mixture then spread the meat mixture over the top of that. Be sure to leave a spaghetti crust exposed. Bake for 20 minutes. Top with the remaining mozzarella cheese, then bake for 10-15 more minutes until golden brown and bubbly.

Enjoy...

Taco Tuesday

Brown some ground beef or ground turkey with some diced onion and if you like it spicy, a little bit of jalapeno. Add your taco seasoning, a little bit of water, and simmer for a few minutes. Serve on soft shells (flour or corn) or crunchy shells and top with your favorite toppings. I use lettuce, tomato, cheese, cilantro, onion, and avocado.


Tacos belong with rice and beans


There you have it! Taco Tuesday. Don’t forget your Tequila!

Grilled Pizza

I decided a while back to try and use the grill. Well, it worked. You get the awesome crisp thin crust with a little bit of char. Damn good!


These are super easy to make and the only clean up really is the dish you eat on and a cutting board! Now that's my kind of meal.

  • 1 refrigerated thin crust pizza dough (makes 3 to 4 individual sized pizzas)
  • Olive oil to brush on the crust so it doesn't stick
  • Sprinkle of garlic salt or Italian seasoning
  • Toppings

Light your bbq grill and heat to medium. In the meantime, get your refrigerated dough out of the package. Layout and cut into 3-4 small manageable pieces. Brush each side with olive oil and season with garlic salt or Italian seasoning. Place dough directly on the grill. Grill until the first side just turns brown. At this point, take your dough off the grill and top the grilled side with your favorite toppings. Take your pizza back out and put on the top rack. Now you are going to get the ungrilled side nice and brown. Grill for about 3-5 minutes more until your cheese is melted - make sure you watch it carefully because the dough can burn quickly.

I made my pizzas with fresh mozzarella, prosciutto, crispy pancetta, and an arugula, balsamic, and fresh tomato salad. 

Devour your pizza with a cold Italian beer or an American Pilsner

Enjoy!

Rockin Rotisserie Chicken


Here is what I did:
Marinade 
  • 1/2 cup soy sauce
  • 1/4 cup packed dark brown sugar
  • 3 tablespoons peeled and finely chopped fresh ginger (from 1 [3- to 4-inch] piece)
  • 1 tablespoon finely chopped garlic (from about 5 medium cloves)
  • 2 teaspoons toasted sesame oil
  • 1 teaspoon freshly ground black pepper
  • 1 3-4 pound whole chicken cleaned
For Basting
  • 1/2 cup soy sauce
  • 1/4 cup packed dark brown sugar
  • 3 tablespoons peeled and finely chopped fresh ginger (from 1 [3- to 4-inch] piece)
  • 1 tablespoon finely chopped garlic (from about 5 medium cloves)
  • 2 teaspoons toasted sesame oil
  • 1 teaspoon freshly ground black pepper
Yes, that is the same recipe - I just made double... Use half to marinate and save half to baste your chicken the next day.

Combine all ingredients and pour over the chicken. I just used a ziploc bag and rotated every few hours. Marinate for 24 hours.

Put your chicken on the rotisserie - make sure you tie up the loose ends with kitchen string - they will fall and prevent your rotisserie from rotisserie-ing. Cook over medium heat until your thermometer reads 160 degrees when inserted into the chicken. While the chicken is cooking baste ever 5-10 minutes to get a nice brown color.

And always enjoy BBQ with a cold beer.

Well, that was it.

Braised Short Ribs

For my braised short ribs, I always go to Snider Bros Meats. It’s not that my local grocery store doesn’t carry short ribs because they do, but they have been so wimpy and small lately that I think it best to just go directly to the meat market.  Snider Bros Meats has the best selection of fresh meat in the valley!

I have only been making short ribs for about a year now, but I have developed a good recipe. AND let’s be honest, short ribs are really hard to screw up. They have a high fat content, so they are pretty forgiving and don’t overcook easily. 

Short ribs before going into the oven
Short ribs after going into the oven
  • 4-5 pounds short ribs
  • Seasoned flour for dusting
  • 1 medium onion roughly chopped
  • 2-3 carrots roughly chopped
  • 2-3 celery stalks roughly chopped
  • 3 cloves of garlic roughly chopped
  • 2 sprigs rosemary
  • 3-4 sprigs thyme
  • 3 cups beef broth
  • 1 beer - optional (you could use any beer you like really - I used a Cutthroat - but I have also used Guinness before)
  • Salt and Pepper
  • Olive Oil
Preheat the oven to 350 degrees.

Coat your short ribs with the seasoned flour and set aside. Add 2-3 tablespoons of olive oil to the bottom of a large Dutch Oven . Over medium to medium high heat, begin browning your short ribs. You will want to do this in batches, so they actually get brown on all sides. Remove short ribs from the pan. Add in the onion, carrots, celery, garlic, rosemary, and thyme. Sauté for a few minutes. Pour in the beer to deglaze the pan - scrape off all those flavor bits on the bottom. Add your short ribs back into the dish. Try and place them in between the veggies. Add in the beef broth. Do not cover the short ribs all the way, but most of the way (you don’t want them to drown, just kind of float).

Place the lid on the Dutch Oven and put in the oven. Cook for one hour at 350 degrees. Turn the heat to 300 degrees and cook for an additional 2.5 to three hours. Try really hard not to peek at the short ribs while they are cooking, you don't want to loose the moisture - just let them cook away.

I served these with sautéed Brussels sprouts with bacon and onion and garlic mashed potatoes.  I should mention that when you serve the short ribs, you don’t eat the veggies. They are more for flavor. You will have a really rich sauce though that you can spoon over the top of the short ribs. Enjoy with a nice cold dark beer or red wine.

Frying a Turkey

Turkey Frying- Are we starting to see a pattern here or what....
I think it is because I grew up on fried food. Fried chicken, homemade french fries,  etc. My mom even fried our corn tortillas when we made tacos. Yep...lots of fried foods.

Every Thanksgiving, my work gives me a turkey. It is a very nice gesture on their part, but it has taken me until now to actually eat said turkey. And I thought, why not fry it? Yep, no good excuse not to.

A few years ago we tried our first fried turkey and let me just say I really don't want turkey any other way (although my mom does make a FREAKING GREAT turkey - so, I think I will take that back). Fried turkey is super moist though...and the skin is oh so crispy. Mmm crispy skin (say that in your best Homer Simpson voice). To make our deep fried turkey even more delicious, I always brine it for a few days too. I think it adds extra moisture and when it comes to turkey, extra moist is always good.


Brine
Basically, you take equal parts sugar and salt and dissolve in water (1 cup of each works well - I use brown sugar, not white sugar). After you have done that, throw in your favorite fresh herbs - rosemary, thyme, sage, garlic, etc. Put your turkey in this happy little bath and let it soak (refrigerate of course). You can also use lemons and oranges in the mix too...just squeeze a couple into the mixture, throw in the peels too and you are set. Let this whole thing brine for 24-48 hours. Here is the brine recipe I typically use:

  • 1 cup brown sugar
  • 1 cup kosher salt
  • 2 oranges (cut in 1/8ths)
  • 2 lemons (cut in 1/4ths)
  • Bunch rosemary, sage, and thyme
  • Fresh cracked peppercorns
  • Water - you need enough so your turkey is fully submerged and covered - 2+ gallons

After your turkey has been in the brine for 1 to 2 full days, rinse it off and pat dry. Season with your favorite dry rub. If you are frying your turkey, you should let it drain for an hour and shove some paper towels in the cavity to soak up the extra moisture. Then, after it has drained, make sure you season it up. If you don't let it drain, you will have a disaster with your turkey fryer. Yes, you would be the person on the news who lit their house and their neighbors house on fire. I don't think you want that.

For frying, get your oil up to temp (350 degrees). Lower your turkey in very slowly, and cook for 3 to 3.5 minutes per pound. Take it out and let it rest for about 15 minutes. Carve it up and enjoy.

I bet you are craving some turkey now! Well, I am still - good thing I have lots of leftovers.


Here is a video of what NOT to do when frying a Turkey! 

Welcome to John's Food Blog...

Welcome to the first post of my food blog... I figured to start it off right we need to discuss how to make Fried Chicken.


Fried chicken - who doesn't love fried chicken? If you know someone who doesn't, don't tell me because I don't want to know them.

I grew up eating fried chicken - whether it was homemade, from KFC, broasted, whatever - we never lacked in the fried chicken department. My girlfriend loves fried chicken too and she grew up eating it as well. Ya know, it is just one of those staples!

Since I read quite a few food blogs, I see little tips and tricks all the time. One tip that I have read several places, is soaking your chicken in buttermilk and spices for 24 hour before breading it, makes the most moist, tender chicken. I have tried this several times and I will tell you, I will not make fried chicken any other way. It really is moist, juicy, and just down right good.


I tried to serve my deep fat fried chicken with at least something healthy. 

1 pound chicken (again your choice)
1 cup buttermilk
salt and pepper to taste
egg wash
seasoned flour for dredging
vegetable oil for frying

Season your chicken pieces with salt and pepper. Place in a ziploc bag and pour buttermilk over top. Marinate in the fridge for 24 hours. 

Shake off any excess buttermilk and dunk your chicken pieces in flour, then egg, then flour again. Let rest for at least ten minutes before frying. Heat your oil to medium high. Place chicken in oil. The cooking time completely varies based on the chicken you use. Make sure all sides are golden brown and the chicken is cooked through.

Enjoy your clogged arteries :)